Pages

Wednesday, May 29, 2013

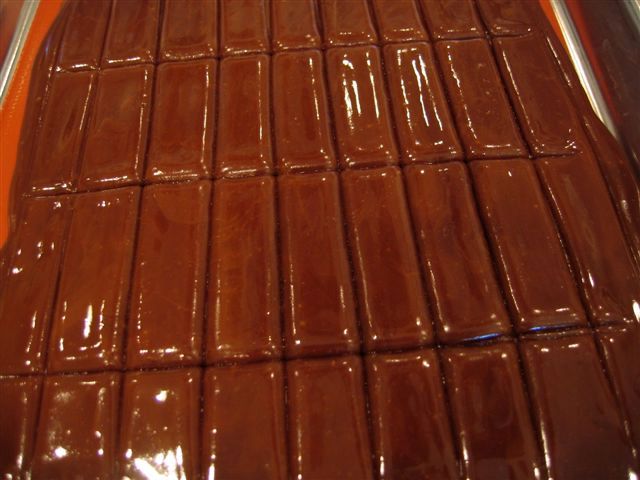
See's Candy Molasses Chip Rival and Toffee Suckers....A two-fer!

See's Candy molasses chips have always been one of my all time favorites. Yum! The Easter Bunny always brought us kids a box of molasses chips every year as far back as I can remember.  It's still quite a tradition in our family and has been passed down a generation. My children still get them whether they want them or not! Thank goodness Mary See's legacy hasn't changed in all these years. Thank those Canadians for having such a wonderful candy maker born in their beautiful country and allowed her to cross the border to be shared with the rest of us. ♥ Who knows what the Easter Bunny might have brought me had Mary not come to Califonia!

Enrobed in 63% Couverture Chocolate


Well, I loved them so much I worked on trying to find a recipe that could match them. It took quite a few years but I found it. It's not the original recipe of course, but it's such a rival and half of my sisters like them better! Shhhh...Mary must never know.

I used the same recipe in these wonderful toffee suckers.

You will not be surprised to find the recipe is from none other than Zoe Francois.

She is such an inspiration to me. I so wish I could go to pastry school just to see and learn how to use all their cool toys! How fun is that!


Chocolate Covered Toffee by Zoe Francois


Sunday, May 12, 2013

It's Mother's Day.....Laugh!

I don't know how this cannot just make your Mother's Day. How cute is that!


Friday, April 26, 2013

Sambazon Açai Café

Açai Bowl with Pumpkin Flax Granola and Coconut ♥
Wow are these little bowls delish! So I was down visiting my daughter and my new son-in-law (sounds so weird for me to say that still!) and she took me to this cute little smoothie shop in town called Sambazon that has these fantastic Açai bowls. They have this great menu of bowls and smoothies with more combinations that you could dream of. So now I'm hooked......

The best part is they sell their unsweetened organic puree in frozen packs so you can buy them and make your own. They offer so many recipes on their website. How fun is that!


Saturday, August 18, 2012

My Daughter Got Married!

How lucky am I to have two beautiful girls. The older one is the bride, the younger is the maid of honor. My son is the oldest of our three children and I couldn't be more proud of my family.

So my oldest daughter has been volunteering our chocolate making skills for a few of her friends for various occasions over the last few years. It has been fun and pushed our skill level that now includes using transfer sheets as well as various shapes with the help of ganache cutters. So when the time came for her wedding she really wanted her favors done with chocolate. Hummmm, isn't there enough stress on the mother of the bride?

We looked at various box sizes and shapes, tried to determine the type of truffle we wanted. Did we want a beautiful heart shape honey ganache paired with a salted caramel using a pink Himalayan sea salt? Did we want to have transfer sheets made with some personal detail? Decisions decisions. How would the weather of a summer wedding affect the process, how would I transport them, did I really want to spend the weekend before the wedding making fresh truffles considering the short shelf life? She lives in Southern California and I live in Northern California....how are we going to overcome that issue...o the pressure was building!

Beach Wedding! We brainstormed and decided to pour solids in various beach themed molds. We had some great little seashells as fillers and the main event were starfish, surfboards, and flipflops all boxed up and tied with a little rustic cord. Worries of weather,  timing, and transporting were over. I could make them a few weeks ahead of time and get them all boxed up and bring them down with me. The pressure was gone....I was on to enjoying the more important things that come with having your first child marry ♥
How fun is that!

Sunday, March 4, 2012

Sweet Milk Scones

This is NOT for the people who like donuts sopping with maple glaze that is so cloyingly sweet you feel like you need a trip to the dentist after the first bite! There are more of a biscuit type scone even though the title suggests they are sweet. They are very tender and light compared with the rock hard dry scones I have tried in the past, no wonder I always disliked "scones".....

These are so simple to make they have become a staple in my house. I use whatever kind of dried fruit I have on hand. I keep a lot of assorted dried fruits and nuts in the freezer because I am always mixing up my own trail mix to bring to work. This is one of those recipes that I never have to plan ahead to make because the ingredients are so simple and always on hand.

The directions make it sound like they take more work than they do....after putting all the dry ingredients in the food processor and pulse to combine, I just throw in the butter; cubed, along with the dried fruit and put the lid back on. I turn it on while pouring the milk down the feed tube simultaneously so that I do not over mix the butter or chop the fruit into a million little pieces. This literally is a 10 second process for the dough to come together...makes it impossible to over-mix your dough! I then dump it out on a lightly floured surface and form a small disc with my hands that is probably about 6-8" across and about 3/4" deep.

I just cut my cute little scone dough pie into 8 scones with my pizza cutter...works like a charm, how fun is that!

Sweet-Milk Scone Recipe

Makes 8-9 scones

Work the dough quickly, don't overmix, and put the dough rounds into the heated oven as soon as possible. The process--from mixing to pulling the finished scones out of the oven--shouldn't take more than twenty minutes. Scones are best served warm and fresh, split open and topped with thick homemade strawberry or raspberry jam and clotted cream (or crème fraîche, marscarpone, or whipped cream). This recipe can be doubled.

Ingredients

  • 2 cups unbleached all-purpose flour
  • 1 teaspoon cream of tartar
  • 1/2 teaspoon baking soda
  • 1/2 teaspoon table salt
  • 1 - 2 tablespoons granulated sugar (optional)
  • 4 tablespoons unsalted butter , chilled and cut into 1/2-inch pieces
  • 1/2 cup raisins, currants, or small soft fruits such as raspberries
  • 3/4 cup whole milk

Instructions

  1. 1. Adjust oven rack to middle position and heat oven to 450 degrees.
  2. 2. Sift first 4 (or 5) ingredients into large bowl, or measure into workbowl of a food processor fitted with steel blade; pulse until blended. With pastry blender, 2 knives, or steel blade of a food processor, cut or process butter into flour mixture until mixture resembles coarse meal with a few slightly larger butter lumps.
  3. 3. If making by hand, (preferred method), make a well in the center of mixture and pour in milk. Working quickly, blend ingredients together with a rubber spatula into a soft, slightly wet dough. If using a food processor, pour milk through feed tube; pulse until dough just starts to gather into a rough ball (do not over process or scones will be tough). Turn dough onto a well-floured work surface.
  4. 4. Quickly roll dough to 1/2 inch thick. Use a lightly greased and floured 3-inch biscuit cutter to stamp dough with one decisive punch, cutting close together to generate as few scraps as possible. Dip cutter into flour as often as necessary to keep dough from sticking. Push scraps of dough together so that edges join; firmly pinch edges with fingertips to make a partial seal. Pat this remaining dough to 1/2 inch thick; continue to cut 3-inch rounds. Place dough rounds 1 1/2 inches apart on a greased baking sheet. Bake until scones are lightly brown, 10 to 12 minutes. Serve immediately.

    Recipe From Cook's Illustrated 
I
Tuesday, February 14, 2012

Gnocchi

There is nothing more comforting than mashed potatoes and gravy, except maybe gnocchi in a wonderful meat sauce! Every now and then I get this craving for soft pillowy home made gnocchi. It's kinda like pasta, once you have home made, there is no going back. The easiest trick for me is to use left over mashed potatoes. I make my mashed potatoes with unsalted butter and a combo of cream, half and half, milk, or chicken broth, and a little salt and pepper...it really depends on what's in the fridge at the time and what I have to use up, so it's never the same. The gnocchi turn out wonderful every time so it really doesn't matter. Now I have to say I do cheat, besides using left overs, I run down to Genova's, a wonderful little Italian deli, and grab a pint of their meat sauce. When you work full time, you gotta have shortcuts! Their meat sauce may be better than mine, but my gnocchi is better than theirs....so it's a wonderful combination in my book. How fun is that !


Gnocchi Recipe

Ingredients

2-3 cups prepared mashed potatoes


1/4-1/2 cup flour to begin with, may need up to 1 cup


1 egg yolk


salt & pepper to taste


1-2 cups meat sauce


fresh parmigiano reggiano cheese, grated for garnish


Instructions


If using left over mashed potatoes, heat in small pot or microwave until warm. If not, make some!
Transfer warmed mashed potatoes to a mixing bowl, add the yolk and mix. Add salt, pepper, and 1/2 cup of the flour. Knead together, I use a fork... and add more flour if necessary, bit by bit, kneading until a slightly sticky consistency is attained.
Lightly dust a work surface with flour. * Form the dough into sausage-like rolls about the thickness of your thumb. Cut into pieces about 1 inch in length. (See my note below, I leave my dough too tacky to be able to do it this way.) Using a fork, flatten the piece as you roll so that the tines leave an imprint in the gnocchi and roll it right off the end of the fork.  Keep a glass of water nearby to clean the fork.
Transfer to waxed paper lightly dusted with flour.
Heat meat sauce in serving platter in oven and keep warm.
Meanwhile, fill a 6 quart pot with salted water and bring to a boil. Reduce heat so the water is a gentle roll. Drop the gnocchi into water, about 12-16 at a time. They will sink to the bottom but will rise to the surface after a minute or three. Continue to cook for another 15 seconds.
Immediately remove with a slotted spoon to a colander. Sprinkle with a little olive oil to keep from sticking together, mix gently and transfer to heated meat sauce dish. Repeat until all gnocchi have been cooked.
Serve with parm on the side!

Kim's Note: * My trick for tender gnocchi is to stay as light on the flour as possible. When the dough is still fairly tacky, I scoop the potato mixture into little balls with a little #100 scoop and let sit for about 10 minutes on my baking sheet. They will develop a slight crust which you can then shape on fork. If you use too much flour your gnocchi will be too heavy, in both flavor and texture. It takes a little practice, but once you get the right consistency, you will be jumping for joy!

Friday, August 5, 2011

Peanut Honey Rolls

My mother should have been a food writer. She finds all these tasty little treats from days gone by. These are a simple mixture of peanut butter, honey, and dried powdered milk creamed together and then rolled in dry roasted, salted peanuts. I wrapped mine in individual waxed paper as you would salt water taffy and kept them in a container in the refrigerator for a quick treat. These don't even require any cooking, but should stay in the refrigerator to keep them firm. They remind me of a payday bar without the corn syrup, sugar, and vegetable oil additives.


She found this recipe in an old book called Honey I Love You - you're so sweet and good to me by the Reverend Maurice H. Ness. Copyright 1966.

These are delightful!....every time I eat one I think....should I enrobe these in chocolate ? ....to be continued :)


Peanut Honey Roll Recipe

Ingredients

1/2 cup peanut butter  
1/2 cup honey  
3/4 to 1 cup dry powdered milk 
1 cup dry roasted, salted peanuts, rough chopped

Instructions

Combine peanut butter, honey, and dry powdered milk with a beater until mixed. Use enough milk powder to get the consistency you like. You can either roll into a log at this point or use a small scooper and make little balls and flatten slightly. Roll or press into rough chopped peanuts and transfer to the refrigerator to chill. Wrap individually if desired.


Recipe by Rev. Maurice H. Ness